AutoBlog: A CI/CD pipeline with AstroJS, Terraform, GitHub Actions
AWS CloudFront Terraform AstroJS Github Actions
Table of Contents
- Introduction
- Starting Point
- Create AWS Infrastructure with Terraform
- Setup AstroJS
- Deploy to AWS with GitHub Actions
- Technical Considerations
Introduction
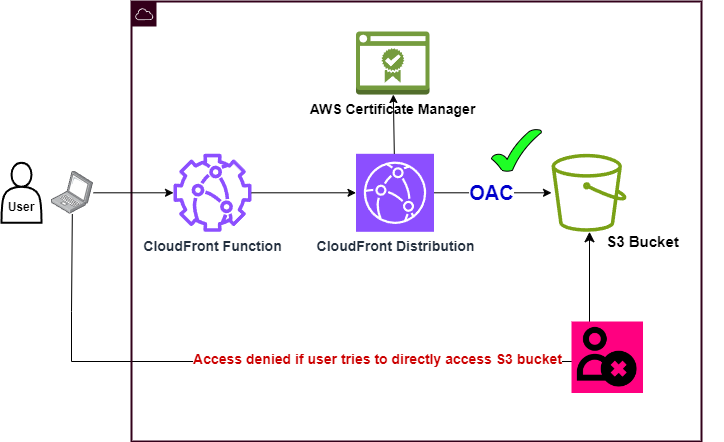
This project involves hosting a website in an AWS S3 bucket without enabling the website hosting setting in S3. This might seem counterintuitive, but enabling this isn’t always the best fit if there are parts of your website you want to keep private or restricted. That’s when we can keep the bucket private and take advantage of CloudFront acting like a reverse proxy to restrict access to the bucket with Origin Access Control.
With OAC enabled a user cannot directly access objects in the bucket even if they have the link. This means they are forced to go through the CloudFront URL which allows you to enforce more security, caching and other benefits.
Starting Point
- GitHub account, SSH key added to account, and a new repository
- AWS account with administrator access
- Terraform installed with access to the AWS account
- nodejs v18+: AstroJS is a JavaScript framework so you’ll want nodejs v18+ installed.
node -vto check. nvm is a great tool for installing and switching Node versions.
Create AWS Infrastructure with Terraform
There should be zero cost associated with this deployment but be sure to terraform destroy when you’re done since it isn’t intended for production use anyway. You can run Terraform locally on any machine where AWS credentials can be provided.
Default Settings and Customization
When you run terraform plan it will ask for Your Github account name, repository and branch name. These must be accurate so Terraform can pass them as values in the permissions given to the IAM Role your GitHub Actions will use for uploading to S3 and invalidating old CloudFront caches. You can go to variables.tf and add these as default values if you don’t want to type them every plan or apply.
The variable enable_openid can be set to true or false to configure OpenID Connect setup trust between AWS and GitHub. You can change it to false if your account already has one. OIDC is to establish trust between AWS and GitHub using short-lived credentials from a role instead of putting AWS Access Keys into GitHub. If you see an error because this already exists you can change the value to false.
AWS Credentials
Do not hard code AWS Access Keys into the Terraform files since by default Terraform state is stored in plain text.
In variables.tf the aws_creds_profile variable is looking for an AWS profile name that has access to AWS. If you’ve setup AWS CLI or made AWS Access Keys yourself and put them in a credentials file at /home/linuxUsername/.aws/credentials or C:\Users\WindowsUsername\.aws\credentials the names are in the brackets such as: [default], [dev], [prod]. Do not include the brackets when changing the variable value, “dev” is what you want or Terraform will think you’re trying to make a list.
- Clone the repository with the Terraform files
git clone git@github.com:ryanef/autoblog-infra.git - Change into the directory:
cd autoblog-infra - Initialize Terraform:
terraform init - Run a plan:
terraform plan- If you haven’t set default values in
variable.tfit will ask for GitHub account information.
- If you haven’t set default values in
- Review the plan. There should be 14 resources to create.
- Apply the plan:
terraform apply - It may take 5-10 minutes because CloudFront Distributions take awhile to create. If successful there should be 5 Terraform Outputs we will use soon:
-
CLOUDFRONT_DOMAIN = “dzpeir0mwsxzy.cloudfront.net”
- This is your CloudFront URL accessible through the browser. It’s not easy on the eyes but you can easily get your own domain working with it through Route53.
-
CLOUDFRONT_DISTRO_ID = “E200VV328813”
- The ID of your CloudFront Distribution. Don’t confuse with CLOUDFRONT_DOMAIN later when setting up GitHub Actions secrets
-
IAM_ROLE_ARN = “arn:aws:iam::303753793241:role/GitHubActionsRole”
- Take note of this, it’ll also be added to GitHub Actions secrets. It’s the IAM Role that gives GitHub Actions permission to upload your blog’s files to S3 then invalidate the old CloudFront cache afterwards so your new files will show.
-
S3_BUCKET = “myBlogBucket1501”
- This will be entered in GitHub Actions later. If you’re not interested in following along with the rest of the guide or just want to make sure everything is working you can upload a simple index.html file to the bucket.
echo '<html><body><h1>Terraform worked!</body></html>' >> index.html && \
aws s3 cp index.html s3://myblogproject1236
Now you can visit CLOUDFRONT_DOMAIN in your browser and if it works you should see the “Terraform worked” text. CloudFront expects an index.html to be present in the distribution settings. You can now remove the html file with
aws s3 rm s3://myblogproject1236/index.html -
S3_REGIONAL_DOMAIN* = “myblogproject1236.s3.us-east-1.amazonaws.com”
Finally you can test if the OAC is working with this. Go to this URL in your browser and you’ll get an Access Denied error. If the CloudFront URL works but going to the S3 URL is blocked, you’ve successfully setup OAC.
Setup AstroJS
AstroJS is a lightweight JavaScript framework that’s great for content driven sites.
If you have node v18+ and npm installed:
-
Install Astro:
npm create astro@latest- Installation will have a few questions. I named mine ‘autoblog-astro’ and went with default settings on the rest.
-
Change into the installed project directory:
cd autoblog-astro -
Start the development server:
npm run dev- If you get an error, you may need to run
npm installbeforenpm run dev - If dev server starts, you should see a URL like
http://localhost:4321
- If you get an error, you may need to run
-
If you want to make changes go to
/src/pages/index.astrois where you can make main page edits on the default template installationindex.astrobecomes index.html in the build phase during GitHub Actions so CloudFront will be able to find it.
When you’re finished editing the blog it is time to push to GitHub. Astro has awesome docs if you want to learn more about it.
Deploy to AWS with GitHub Actions
Earlier when you ran Terraform it output the IAM ROLE ARN, CLOUDFRONT_DISTRO_ID, S3_BUCKET values and we need to use those soon. You can run the terraform output command from the directory where your .tf files are located to see them again.
Create a workflow.yml file
In your Astro project folder:
- Make a folder named
.github- Don’t forget the . in the folder name. Keep in mind this folder is different than your
.gitfolder as well. Both should be located in the root of your Astro project.
- Don’t forget the . in the folder name. Keep in mind this folder is different than your
- Inside of
.github, make another folder namedworkflows - Create a file named
workflow.yml - Copy my workflow.yml file from Github
You can copy and paste the workflow.yml entirely, just make sure you have the .github folder in the root directory of your Astro project.
Add Secrets to GitHub Actions
To keep things simple we’ll add a few secrets manually but some of this could be automated as well because Terraform already puts these in Parameter Store.
- Make a new GitHub repository if you don’t have one already and go to the repository’s settings
- Make sure you’re in GitHub repository settings, not your GitHub account settings
- Go to
Secrets and Variableson the left sidebar and go intoActionshttps://github.com/YourAccountName/autoblog-astro/settings/secrets/actions
- Add the secrets names exactly as shown to match the default workflow.yml config:
- IAM_ROLE
- S3_BUCKET
- CF_DISTRO_ID
In secrets.tf you may notice we’re putting these in Parameter Store as a SecureString so automating this in the future would be possible by having the workflow.yml do a few extra things. I didn’t include that by default so people could familiarize themselves with how GitHub Actions is handling the secrets. It is using Parameter Store instead of AWS Secrets Manager to keep the spend at $0.
Push to Git
The workflow.yml is configured to watch for updates to the main branch so after you push changes to main, GitHub Actions will deploy your site to the infrastructure we made with Terraform.
In the root of your Astro project directory:
git init
git remote add origin git@github.com:YOUR_GITHUB_ACCOUNT/autoblog-astro.git
git branch -M main
git add .
git commit -m "first"
git push origin main
Now go to your Actions page at https://github.com/yourAccount/repoName/actions/ and you should see the job has automatically started.
When it says job is completed you can go to your CloudFront URL and see the Astro deployment is live and running.
That’s it! Now every time you push code to the main branch, GitHub Actions detects and deploys.
If you get any errors about assuming a web identity with the OIDC role, double check variables.tf and make sure you put the right GitHub account name, repository name and branch name. The AWS IAM ROLE needs that information to be correct to grant permissions.
Technical Considerations
S3 Details
When S3’s static website hosting setting is enabled, AWS creates HTTP website endpoints for the bucket and this gives some extra features such as support for redirects. This is why things automatically work if your website is structured like this:
index.html
blog/my-first-post/index.html
blog/mysecond-post/index.html
store/index.html
In our case, we do not have static website hosting enabled so CloudFront will make calls to S3 over the REST API instead of the HTTP endpoints. Let’s say your website is example.com then CloudFront will be able to find https://example.com/index.html because there’s a setting in the CloudFront distrbution where you can define that, but you can’t tell it about any subdirectories your website has. This goes back to how S3 is a flat file system and doesn’t truly have directories, it only has objects that are named in a way that look like they are in folders. If you have /images/holidays/beach.jpg, there can be a bit of an illusion there are two folders “images” and “holidays”, but really all you have is an object named “/images/holidays/beach.jpg”
If a user tries to go to https://example.com/blog/my-first-post/index.html and doesn’t have HTTP endpoints enabled there will be a REST API call looking for an S3 object with the key https://example.com/blog/my-first-post/index.html and of course that does not exist. The S3 key is actually just the /blog/my-first-post/index.html or /images/holidays/beach.jpg part and doesn’t have the “https://example.com/” in the key. Read more about differences between REST and HTTP endpoints in the AWS Docs.
CloudFront Function and Distribution
The CloudFront Function we have solves the subdirectory issue and the function itself is really simple. All it needs to do is check the URI of the request, see if it ends with a ”/” or ”.” then adds “index.html” to the end of it.
The function turns a request to “https://example.com/blog/my-first-post/” into “https://example.com/blog/my-first-post/index.html” and this still works even if the user doesn’t type the trailing slash on “my-first-post/” because it’s automatically added when the browser sends the request anyway. Just like how there’s actually a period at the end of domains “google.com.”, “ryanf.dev.”, or “youtube.com.” and that’s abstracted away from us. That implicit period refers to the root of the DNS heirarchy.
When it comes to telling CloudFront distribution about the origin of your content, it wants to know if the origin is an S3 Origin or Custom Origin. This can be a little confusing but just remember if an S3 bucket has static website hosting enabled it is considered a custom origin, not S3 origin.
This is using Origin Access Control(OAC) instead of an Origin Access Identity. AWS introduced OACs in 2022 and it became the recommendation over OAIs for its extra built-in security features like use of short term credentials, credential rotation and more. When a user’s HTTP/S request comes in to the CloudFront URL, the OAC uses the SigV4 signing protocol to sign the request then the S3 origin can authenticate or deny the request.